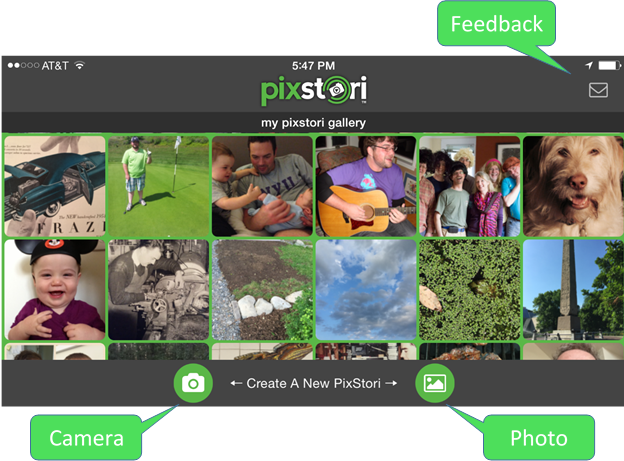
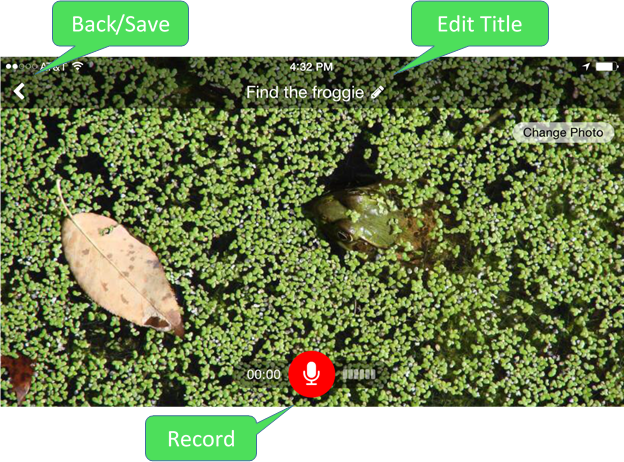
First you pick a picture. On the Start screen tap the Camera icon on the lower left to take a picture with your camera or tap the Photo icon on the lower right to select a picture from your camera roll. Then you Record your story. Tap on the microphone icon and start talking. Tap again to pause or stop recording. Then tap the play button to listen to your recording. Tap Re-record to start over with a new recording.
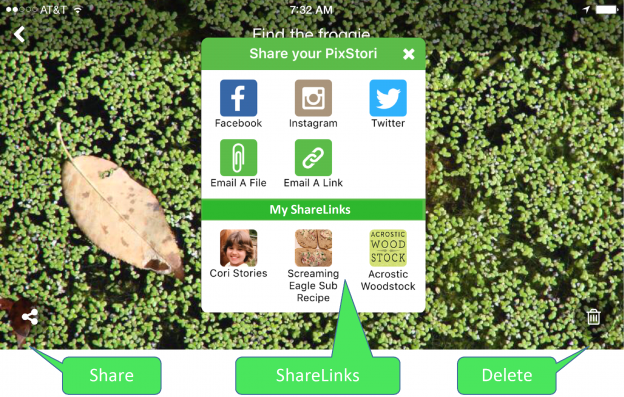
Tap the Back/Save icon on the upper left of the screen to save the PixStori and return to the Start Screen. Or you can tap the Share icon on the lower left to save and share your PixStori. You can delete your PixStori by tapping the Delete icon on the lower right of the screen. You can add a short text title by tapping the title bar at the top of the PixStori to see the keyboard. You can change the title by tapping the Edit Title icon that looks like a pencil. Tap the Feedback icon on the Start screem to send us an email.
PixStories longer than 20 minutes can’t be shared as video files in PixStori. Generally it’s better to make several shorter PixStories with different pictures. The Auto-Lock feature on your device can limit the recording time by putting the app to sleep while it is recording. Make sure the Auto-Lock setting (Settings | General | Auto-Lock) is set to longer than the length of time you want to record or set it to Never. Remember to change it back to a shorter time when you are done so it will save on your battery life by going to sleep.
When you tap the Share icon you will see 5 options:
To share through email you must have your email account installed on the device where you created the PixStori. To share to social media you must have Facebook, Instagram or Twitter installed on the device where you created the PixStori.
No. You can share your PixStories with anyone on any device or computer who can open an email.
First you need to have Facebook installed on your device. Then you will be prompted for permission to let PixStori post publically to your Facebook account. If you say No when you are prompted you will have to go into the Facebook settings. On an iPhone you start with the More command in the lower right corner and then select Account Settings | Apps and let PixStori post publicly.
Search for PixStori in the Apple App Store and tap the Download icon.
Yes. You need to have both PixStori and Instagram installed on your iPad. To install you first search for the app in the App Store. When it returns the search results missing PixStori or Instagram, change the setting that says “IPad Only” in the upper left corner of the App Store to “iPhone Only” and you will be able to search for and install the apps. Once both are installed it works just like it does on the iPhone.
Yes. After you start recording, you can tap the pause button at any time and then press the record button again to add to the recording you have already made. You can do this as many times as you like. It can make telling a longer story easier by giving you time to compose your thoughts. Note: After you play your recording you can’t add more to it. You have to either start a new recording using Re-Record or keep the whole recording you already made.
Re-record lets you start over and make a new recording after you listen to your recording. The new recording replaces the old one. Tap the Re-Record button on the upper right side of the record screen just below the title bar. Note: You can’t add on the old one after you have played it. After you have shared or saved your PixStori you can’t Re-Record. To tell a new story about the same picture you have to make a new PixStori.
PixStori works like the iPhone Photo Gallery. Just change the orientation of your iPhone or iPad to have the photo fill the screen. When you export your PixStories they will be 4:3 ratio for horizontal or 3:4 for vertical or 1:1 for square photos. Panoramic photos will be cropped to fit 4:3 ratio.
You can change the picture by tapping the Change Photo button until you start recording. After that you have to go back to the Start Screen to select a new picture for your PixStori.
You add or change the PixStori text title at any time until you save the PixStori by going back to the Start screen or by sharing your PixStori. You’ll see a Edit Title pencil icon in the title bar to indicate that you can make changes to the Title. Titles are limited to 40 characters.
The first time you tap the camera icon in PixStori you are asked to permit PixStori to access the camera. If you say no you have to change that device setting to permit access. On the device, go to Settings and scroll down to PixStori and tap and move the “Allow PixStori to access” Camera to the right so green is showing. The same is true for accessing Photos and Microphone and Cellular Data.